Tuesday, September 3, 2019

Black and White Tablescape for Fall

Black and White On The Table For Fall


Hello everyone!  Black and white may not be the colors most associated with Fall, but today I'm going to show you how I created a Fall tablescape using these colors. I'll be playing a bit with different arrangements of items on the table so you can get different ideas for arranging a similar table.


This tablescape began with black and white placemats that share a wonderful message. I am definitely blessed! These are from the Dollar Store as are several other items used in this tablescape.


The napkins for this setting are actually kitchen towels that say, "Blessed and Thankful."  I surrounded the hurricane lamp with a wreath I covered with black/white checked ribbon. The faux candle inside has a bracelet of the same ribbon and the little white pumpkins are topped with bows of the same ribbon. Our dishes are white which makes a black and white theme easy! Towels, pumpkins, wreath and placemats are from Dollar Store. Hurricane lamp and ribbon are from A.C. Moore.


I saw these napkins at the Dollar Store and really like them, also, so I'm switching out the towels for these.


And now I can use the towels on the front of the oven! Versatility!


And, I decided it looked kind of cute with the pumpkin on top of the napkin. 


Which arrangement do you like best? Towels for napkins?  Pumpkins on top of the paisley napkins?  Hope you'll let me know in the comments!  Total cost for this tablescape was not much.  I hope to use the hurricane lamp eventually on the dining room table, so you will see it again when I reveal that room! Are black and white colors you think of for Fall? 

Until Next Time,
Debbie

Tuesday, August 27, 2019

Match Made In Seven: Our Music Icon

Music Icon(s) From The Seventies


Hello everyone, and welcome to another edition of Match Made In Seven. If you are new to the blog, here is a review of what we do here at Match Made In Seven.


We are an international group of fashion bloggers who meet once a month. One of us chooses a theme in turn, and that can be anything. A book, music, a color, a movie. And then we style an outfit based on that theme. The theme of this month is chosen by Nancy and is: Our Music Icon! Also, take a look at the other bloggers and how they have interpreted the theme this month. (See list at end of post)


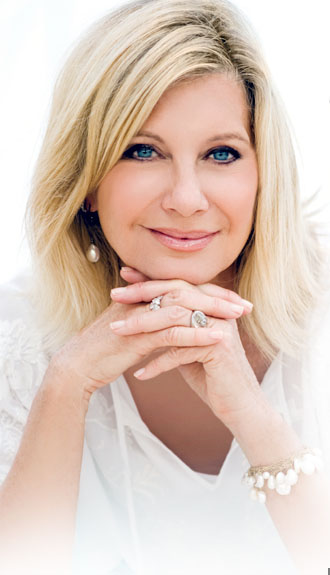
When Nancy told us her choice for this month's theme I started pulling CD's off the shelf trying to figure out how to choose just one music icon! I'm pretty eclectic when it comes to music and what you see displayed here doesn't even touch on classical! My upbeat musical tastes were honed during the seventies when groups like the Bee Gees, The Carpenters, Captain and Tennille and the musical styles of disco were all the rage. But, one icon seemed to stand out as I perused my collection and I have chosen her for this post; Olivia Newton-John. 


Olivia's career has spanned decades and along with loving her songs such as "Hopelessly Devoted to You" and "Let's Get Physical" I also admire her strength as she has battled cancer three times. I loved her in Xanadu and Grease. As I researched photos of her I noticed that often her clothing style is casual, yet stylish, like you see in the CD cover above. I also remember that in the seventies when I first began listening to her music, I was most often seen in jeans, a tucked-in tee shirt and tennis shoes. So, that's how I'm styling myself for today's post. We'll call it "Flashback to the Seventies" styling!


So, here I am in my favorite 1970's outfit....oh, who am I kidding, it's still my favorite outfit!  I chose my thrifted yellow tee with butterflies on the front, my Vintage American Blues jeans and my New Balance running shoes for my icon outfit. My hair is styled similarly to Olivia's on the CD cover. 


I chose simple, small blue earrings to wear. I didn't go in for big earrings or lots of jewelry in the seventies. 


I loved to dance and found the disco vibe of lots of Olivia's music easy to dance to along with the music of my other icons. 


As I've been reading up on Olivia I have been impressed by her positive outlook on life as she battles cancer and her love for her daughter and her husband. She still performs today and is loved by so many fans around the world. 

Source:https://www.onlyolivia.com/img/ooex.jpg


And, she certainly is lovely, inside and out!


Please be sure to stop by the other lovely ladies' blogs to see how they are styling this month's theme! And, I would love to hear about your music icon when you leave me a comment! 


Until Next Time,
Debbie

Monday, August 26, 2019

Easy DIY Flower and Paper Crafting Projects

Sharing Recent Craft Projects


Happy Monday!  I thought today would be a good time to share some of my recent craft projects with you. I've been busy in my craft room working on some more paper crafting/sign making as well as doing some new flower arrangements for the foyer table. I hope you enjoy!


I just haven't been inspired over the summer to change up the foyer table until a few days ago when I was browsing instagram and saw a pretty flower arrangement in a vintage type box. I began thinking how pretty such a box arrangement might look on the foyer table, so I went looking for a box to use. I ended up buying one on, of all places, the wedding aisle at A.C. Moore. The box you see above is one of those boxes you see couples use at weddings for guests to place cards inside. It's a whitewashed gray color and has a removable top with a slot. I simply turned the side that says "Cards" toward the wall. 


I wanted to choose flowers that would pull out the colors seen in my pretty quilts that hang above the door. I already had a few such silk flowers but I need more, so I went hunting at the Dollar Store to see what I could find.


I'm really pleased with the addition of the green and orangey/gold flowers to the mix. Just what I wanted! I decided to enhance the box arrangement by adding my faux succulents to the front and moving my succulent wreath to the hanger behind the box. I didn't like the hanger pole showing through the wreath, however, so I draped a crochet doily behind the wreath and added my wooden house as an accent. What do you think? Would you rather see the pole or do you like the doily and little house addition? 


I'm trying to decided if this is too much for the foyer table and if I should just have the box display without the wreath. What do you think, readers?  You will also notice that I switched out the door wreath and added the "R" I created awhile back underneath the wreath. 


Next up, is some paper crafting I did to create a new sign. I used some brick style scrapbook paper to create the background design and then added 3-D homestyle stickers on top.


Here's a closeup of the stickers.


And, here is the completed sign. Not sure where I will display this, yet. For now, it is gracing my craft room!

Hope you enjoyed my crafting today. Be sure to let me know your thoughts in the comments. Have you signed up to follow me by email yet?  It's so easy and you won't ever miss a single post! Just look for the sign up on the sidebar of my blog.  And do be sure to stop by Wednesday for another edition of "Match Made In Seven" an international blogger group collaboration.  See you then!

Until Next Time,
Debbie


Saturday, August 24, 2019

My Upcoming Online Courses Through Be A Disciple

Online Courses I Am Offering


I will be teaching two online courses through beadisciple.com coming up in September. One is a course I personally wrote entitled, "A Daily Dose of Faith, Hope and Love," which is a five day course that focuses on I Corinthians 13. The other course is a book study on Trevor Hudson's book about The Serenity Prayer. The course is entitled, "Finding Serenity" and is a two week course. No book needed for Faith, Hope and Love but you will need the Trevor Hudson book for the Finding Serenity course. Cost for each course is $50. Link is attached for the Be A Disciple site if you are interested. I would love to have you in my online classes! See links below. 


Until Next Time,
Debbie

Thursday, August 22, 2019

The House That Love Built Series Four Before and After

The Before And After Photos and A Few Final Thoughts 


Hello everyone and welcome back to the fourth and final installment of my series, "The House That Love Built." I hope you have enjoyed the three previous posts in which I have given you a behind the scenes look at our sixteen year renovation project on our current home. Along the way, I have shared construction images, favorite spaces and told a few tales about our adventures in this house. I even gave you a little history of where we lived before moving into this house. Today's post will be a bit of a review (teacher talk) in which I show you before/after photos and talk a little bit in general about the concept of sweat equity. Hope you enjoy!

Kitchen Before


Kitchen After


Living Room Before


Living Room After


Master Bedroom Before


Master Bedroom After


At this point, I'll pause the pics for a bit and talk a little about the sweat equity concept. Have you heard of that term? The first I heard of it was back in the 1980's while watching the "This Old House" series on PBS. Bob Vila, Norm Abram and the rest of the This Old House cast would take an old home and show the viewers how they could do the DIY work in order to renovate the house. By doing many of the restoration jobs themselves, the home owner could save a lot of money and, therefore, have more of an investment in their home. My husband and I have applied this idea of sweat equity to all three houses we have owned. We did as much of the work on each house as we could, learning a lot along the way. I think sweat equity is an interesting concept in today's "gotta have it now" world. This concept takes hard work, the ability to learn and, most importantly, the ability to wait on something being completed. Sweat equity does not produce fast results. But, it does produce projects done by yourself with fewer costs and gives so much pride in the completed project! Naturally, each person must make up their own mind about how much DIY work they are willing to do and how much they wish to hire out to others. I have to admit that, on my own, I most likely would not have done the amount of sweat equity work as we have done together as a couple. My husband enjoys this type of work and not everyone does. There are also certain jobs with house renovation that need to have licensed people doing the work for safety such as electricians and plumbers. It's very important to do DIY home projects safely and to also know the permits that are required in your area. 

Craft/Guest Room Before


Craft/Guest Room After


In the end, sweat equity can be a satisfying way to achieve your home renovation. I know that the Mr. and I feel true ownership of our home because of the countless hours of work that have gone into transforming this house into a home. It hasn't been easy along the way, but we both know that it has been worth it! 


Thanks so much for going on this "memories of renovation" journey with me in these last four posts. Next week I'll be back to styling life with you as I share a recent craft project and on Wednesday, August 28th, be sure to stop by for another Match Made In Seven international blogger's post. I think you will get a kick out of this month's theme!

If you missed the previous posts to The House That Love Built:
Part One
Part Two
Part Three

Until Next Time,
Debbie

Wednesday, August 21, 2019

Nature Photography At The Arboretum

How I Did Nature Photography


On a very hot day yesterday, I walked around the North Carolina Arboretum, camera in hand snapping photos of amazingly beautiful flowers, plants and butterflies. I have been working to improve my photography skills this past year and I'll share a couple of hints with you. 


I am not a professional photographer by any stretch of the imagination. My husband is an excellent photographer, however, and shares tips with me. Plus, just from doing four years of blogging with my little camera, I have picked up a few tried and true things I think about when doing photography. 


First off, I look for interesting features that catch the eye-things like the water dancing upward  in this water fountain. I shot this picture with the sun behind me which made for a clearer picture. Having people in the background gives some scale and interest to the photo as well.


Notice how this picture of the same water fountain looks different. The dancing water is not as crisp because the sun is in front of me. There is more of a shadowy effect which brings out the swirls in the water. I wanted to highlight the mountains in this pic, but the swirls in the water seem to stand out more. For me, photography is still often trial and error.


I also like to zoom in on points of interest. Here, I am zooming in on the beautiful butterfly while making sure leave greenery and flowers around the butterfly for framing. Framing the main point of the picture is important.


I also try to follow the rule of thirds. My main focus in this picture is the tree trunk filled with lichens. I centered on the tree trunk and tried to have one third green on either side. 


Depending on what you are trying to capture in your photo the rule of thirds may not work. In this photo I wanted to highlight the kinked tree trunk as well as the dramatic drape of the pines. 


This picture shows a variety of heights which is interesting. I decided to zoom in on the pink flower you see in the upper right. Look at the next picture to see the zoom effect. 


Wow, you can really see the intricate details of the petals can't you?!  I also got a little bit of bokeh which is always exciting for me. Bokeh is when the background of a picture is blurry with the main focus of the picture being crystal clear. I do not use a camera that has changeable lens like my husband's. My camera is digital-a Sony Cyber Shot. It does have different settings I can use by turning the setting dial which is a nice feature for a little camera. I was using "Superior Auto" for these pictures.


These plants reminded me of Florida. The angle I shot at shows one behind the other giving a little depth to the picture.


This is an example of a not so good picture. I love the color of these flowers but, unfortunately, the wood stick on the left and the metal something (not sure what it is) on the right take away from the pretty flowers. Oh well. Not framed well.


Good bokeh here focusing on the bumblebee on the pink flowers.


And, finally, finding a cluster of objects such as these three flower containers together provides an interesting picture with the variety of colors and foliage! 

Hot as it was, I enjoyed walking around the arboretum and looking at nature through my camera lens. I hope you enjoyed walking with me and, perhaps, I gave you a helpful hint or two about taking pictures. If you already knew all of this, I hope you enjoyed the photos!  Do you like taking nature pictures? Hope you'll leave me a comment. I love hearing from my readers. 

*All photography in this post by Debbie Ross


Until Next Time,
Debbie